Proper Golf

Sunday, August 14, 2011

Donald Ross Greens

Over the last 2 weeks, we have begun renovating the 3 of the 4 Donald Ross original greens during our large scale renovation. A number of the original 27 holes laid out by Donald Ross (the other 9 of the 36 holes were originally designed by Charles Banks) have been altered over the years, including some of the more severe greens that became unplayable with modern green speeds and maintenance techniques. The 3 greens that we are currently renovating are what the superintendent describes as "The B Team", meaning the most extreme and difficult of the remaining original greens. Many of the original Ross and Banks designed greens do still exist on site, however much of the course has been tweeked and altered over the years over the years by the Jones family of architects, who call this place home.

All 3 greens are the high points for each individual hole and were built up on a nice layer of black topsoil with varying fill materials and rocks underneath. Two of the greens (#5 and #9) are split into 2 tiers separated by deep a swale, while the other (#3) was simply small and steep, containing 6 feet of fall from back to front. While each of the 3 greens will be softened to some extent, 2 of them will also be expanded, all in hopes of gaining more pin positions, significant drainage improvements as we are rebuilding them as USGA greens and better playability in terms of difficulty for the members.

Here are photos from the process so far from the 2 of the greens that have been approved by the architect.

Green #3

The plan with GPS'ed elevations. Existing grades and features in green and lighter black line weights, new grades and features drawn in with orange and the heavier black lines.

Stripping the green, which will be transplanted to one of 2 turf nurseries on site for future use during other green expansions later in the renovation.

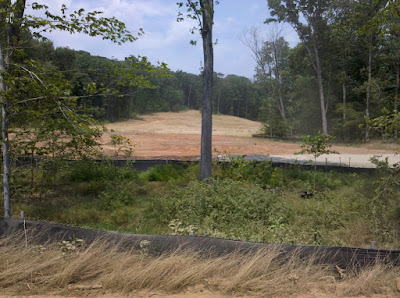
View from #3 tee. All the grass has been stripped around both bunkers we will be renovating along with the green. A few trees have also been removed on the right
and in the back of the green.

The topsoil layer under the green and colored has started to be stripped away with the trackhoe and stockpiled on sight for use throughout the rest of the renovation.

I have now removed about half of the topsoil from under the green. The guys in the background are digging up the irrigation heads to be removed and saved. The pipe however will be trashed as the green is being expanded and some of the surrounds regraded right where the existing irrigation lines run. We are getting ready to set stakes and take elevations as well.

More topsoil has been removed. You can see old irrigation pipe sticking out,
waiting to find its way to the trash.

Grade stakes are being set and the fill layer beneath the topsoil is being removed
around and between the stakes.

Finishing up coring out the green to sub-grade. Ready for shaping now.

Shaping the sub-grade inside the green well has begun.

Initial shaping according to the plan is complete. Now waiting for the architects approval before sub-drainage can begin.


Altering the shaping to the right side of the green. The right side, where the green has been expanded and ties into a roll and swale, needs to be softened even more to tie in better.

The green has now been approved and sub-drainage has now been installed to
drain out of the front left corner of the severely sloping green.

The sub-grade is being cleaned up and raked out by hand, removing any minor imperfections. More stakes are now being added as well so all the subtleties can be captured when the 4 inch stone layer goes on next, followed by the 12 inch root zone mix layer.

11 loads from my 10 ton articulating dump truck, which is approximately 4 1/2 tri-axel on road dumpers is being wheelbarrowed and raked out to 4 inches by hand on this small green. The entire green must be covered with exactly 4 inches in order to retain all the same slopes at the sub-grade and then again at final grade with the 12 inches of root zone mix so perfectly consistent conditions can be realized in the USGA green building specifications.


Green #9

View from the front left corner of #9 green. The pin is sitting in swale separating the two severe tiers in the green. Irrigation heads are being dug up and removed by hand by the guys in the background.

Pre-renovation view of the green from the back right corner, looking through the swale between tiers. The exposed dirt you see is where topsoil has been striped and drainage has already been installed in the swales and low areas surrounding #9 green.

Sod is being stripped, rolled, and transplanted on one of the turf nurseries for later use.

Topsoil is being removed from underneath the green, transported
around the site and stock piled for later use.

More top soil being removed from the upper tier of #9 green.

Stakes are being set and fill is being cored out down to 16 inches below finish grade. A little bit of shaping has been done with the dozer and pushed to to the trackhoe,
to be hauled away on site.

The top tier of the green has been shaped out. The lower front tier
is still being cored out to subgrade.

View from the front right corner of the green as the edges of the green well are being built up the shaping inside the well can be finished. Doing the shaping inside a well can save a lot of time and money if the architect is able to visualize the finish grade, and the operators are capable of shaping the ties ins at subgrade, 16 inches below the green surrounds.

Shaping of the green is now finished and approved, awaiting installation of the sub-drainage. Rough shaping of the approach is now underway as well via the bulldozer.

Sunday, August 7, 2011

Heritage Creek:Pennsylvania's Newest Golf Hole

I was out at Heritage Creek a few weeks back, where we have been building 3 NEW! golf holes to add to the 6 already in play at Kelly Moran's Heritage Creek in Warwick, PA. On one of the hottest days of the year, I was helping turn on the irrigation and seeding/sodding Pennsylvania's newest golf hole, which will be 1 of 3 to finish construction this summer/fall. Holes #3-5, the first of the new holes, will join #6-11 in a 9 hole loop which plays along and now over the creek and number of protected wetlands. I've been told that the members and die-hard players of the current 6 hole loop are so excited to add the 3 new holes that bleachers may even be installed to watch the crane come and install the irrigation line that will cross the creek and connect all the holes!

View from the right tee box on the par 4, #3


Approach to the green. Plays over a protected wetland area. The grass is the ring of rough blue grass which has just been put down. If you look closely, the you can see the sand pro on the green getting ready for seed. The fairway/approach area will also be seeded.


View from the front edge of the very large and severely sloping green with irrigation testing going on in the background. According to the plan on the website, this green was originally supposed to be part of a double green to be played by holes #3 and #12.


Back view of the green.


Another view from the back of #3 green with more irrigation testing going on.


Hole #4 which will be the next hole to be finished and grassed. This hole, a shortish par 4, will play up the hill on the tee shot then hooks off the right across another wetland where the green has been built into the side of a hill.


Saturday, July 16, 2011

Turning 2 Bunkers into 1

On a Donald Ross hole that plays uphill all the way from tee to green, some newer bunkers have been added to the right side of the green to help prevent balls from running out of bounds and into an old rocky swale. The set of three smallish bunkers that have added, don't quite fit in the same style the other bunkers we have been renovating, so the architects have decided to let us blow up the two back bunkers and combine them into a larger bunker with bolder outer lips, and finger where the divide used to be.

I did my best to take photographs every hour or so of the process.

Sod has been stripped and sand has been removed

I've blown up the divide in the bunker (see the old irrigation pipe that used to run through). We have used that soil to regrade the bottom of the bunker and raise up what use to be the middle bunker. (view from bellow)

Regrading the bottom of the bunker. (View from above)

Regrading is now finished and ready to start reshaping. The pile with the irrigation pipe sticking out is where the new finger will be built off of.

The finger has been roughed in and outer edge is starting to take shape as well.

Shaping is done and ready for topsoil.
Drainage is going in and topsoil is still going down.

Sunday, July 10, 2011

Bad Golf Course Architecture


I found this image while scrolling around Hainan Island, China, where the worlds biggest/only golf boom is going on. Although I will not give out the name of the course, it may be the worst example of golf course architecture I have ever seen.

Upon closer examination its pretty clear this is holes #9 and #18, as you can see the placement of the clubhouse just beyond both greens and how they both play the same direction. Now we have all played holes that people claim as gimmicky, and condemned even some of our favorite designers for doing silly things, but I think this mirrored excuse for 2 golf holes, around irrigation ponds, and super tight wiggly bunkers takes the cake. Having two holes play in such a manor does not create any sort of interest in playability, strategy or aesthetics, but instead a poor exercise in landscaping. I understand that the two holes play to opposite ball flights, one a draw and the other a fade, but considering how close the two are and the fact that nothing visually separates them, it seems if they probably appear the same from the tee, offering no variety; the biggest sin in golf course architecture as far as I'm concerned. No attempt to at least pretend like it mimics nature in any of its features or shapes... When I see stuff like this it makes me want to puke!

Tuesday, June 28, 2011

A Deep Trench

Mi amigos "Flaco Trackhoe" and Joel

Above is picture I took from the high side of drain that will connect one catch basin around the back of a green, under irrigation, under a road and into a bigger catch basin. Clearly the trench was very deep, but in order to keep the pitch, we had to go very deep through the mounding used to build up the green and bunker.

Some things we did to make it easier/keep it safe:
  • Found all the irrigation that we would be near or digging under, and exposed the pipe by hand.
  • Used a bigger bucket than normal
  • Lowered and flattened (it was a severe left/right slope) to keep the trench from going above head level and make it easier/more comfortable for the operator
  • Kept spoils well clear of trench and on downhill side to prevent cave-ins and to help balance out my machine as we went along
  • Rotated the machine one the mounding was crested so the dozer blade was always on the downhill side

Thursday, June 16, 2011

Some recent shots from work, Banks Renovation

I've been spending most of my time on the renovation of 9 holes originally designed by Charles Banks. We are on Phase 2 of 4 with the other 27 holes originally designed by Donald Ross.

Banks #1 "Punchbowl"

view from left approach:
some sod has already been stripped by hand

view from left:
More sod is being stripped by hand and now with trackhoe helping. You can see the truck is loaded and on our plywood haul road to minimize damage


View from back corner of bunker:
Sand has been removed and the drainage has been installed. Some de-thatching has begun as well as re-topsoiling. No major reshaping is taking place, although some edges will be adjusted and sand will be more visible.

View from haul road:
The backside has been prepped from sod, the edging is being finished by hand and the extra topsoil is being loaded out for safe keeping.

View from approach:
ready for sod

Banks #6 "Alps" (right greenside bunker)

View from front:
Some minor re-shaping on the front edge to make sand more visible. Top soil has already been removed on the right, cut is being made on the lighter brown soil, and shiny soil left is untouched grade ready for de-thatching and re-sodding

View from front:
Subgrade has been reshaped, ready for topsoil and finish grade.

Friday, June 3, 2011

Formulaic Bunkers


Lets debunk some bunker myths, "rules", architectural theory, whatever...

  • Bunkers are hazards.
  • There should never be hard fast rules about the shapes of bunkers.
  • It is not written in stone that sand must be visible.
  • There is no such thing as a "fair bunker".
  • Building every bunker so its easier to get out from the side nearest the target and harder from more offline positions is boring and doesn't add anything to the game.... Golf is not fair.
  • Bunkers require drainage, natural and most often built.
  • Bunkers require maintenance, both raking and mowing (which can get very complicated depending on shapes/slopes/machines).
  • There is nothing formulaic about naturally existing landscapes or linksland where golf originated, why should built bunkers require a formula to play the same game?
Which version of the same hole do you like better?